· 23 min read
Low Enroute Chart Symbols: Airways, Fixes and Altitudes
Decode low enroute chart symbols: airways, NAVAIDs, MEA, MOCA, reporting points and special use airspace, with keyed examples for knowledge test prep.
Can you name every symbol on a low enroute chart and still pick the wrong altitude for the segment? Yes, and that gap is where most students get stuck. Knowing that V12 is a Victor airway doesn't tell you which nearby number controls your clearance, which one only promises obstacle clearance, or which triangle creates a report you owe ATC.
That's why you shouldn't study low enroute chart symbols as isolated icons. Learn them as clusters. A route line, its altitude labels, a fix, and a reporting point work together, and your job is to decide which element controls each part of the flight.
Table of Contents
- Quick Lookup Table for Low Enroute Chart Symbols
- Where Low Enroute Charts Apply and What They Show
- Airway Symbols by Navigation Source and Color
- Reporting Point Triangles Pilots Must Classify
- Altitude Abbreviations MEA, MOCA and MAA Explained
- NAVAID and Fix Symbols on Enroute Charts
- Special Use Airspace and Route Notes to Recognize
- How to Read a Symbol Cluster Step by Step
- Build a Symbol Drill Before Your Knowledge Test
Quick Lookup Table for Low Enroute Chart Symbols
Start with this one minute scan. It won't replace the current chart legend, but it'll give you the symbols you'll meet most often and a fast way to test whether you can name them without prompting.
The chart scope is simple. According to the FAA Instrument Procedures Handbook chapter on enroute charts, FAA low altitude enroute charts are designed for IFR navigation below 18,000 feet mean sea level, covering the lower 48 United States and Alaska. Their symbols organize routes, navigation aids, fixes, airspace, airports, communications information, and altitude restrictions into one compact format.
The Symbols You'll See Most Often
| Symbol or label | Meaning | Where it appears |
|---|---|---|
| Black line labeled V12 | VOR airway identifier | Along VOR based airway segments |
| Brown airway with colored name (Amber, Blue, Green, Red) | L/MF airway | Along low or medium frequency routes |
| Aeronautical blue line with named waypoints | RNAV route | Along low altitude RNAV routes |
| Solid triangle | Compulsory reporting point | On the route, where the report is required unless ATC advises otherwise |
| Open triangle | Reporting point on request | On the route, where ATC may request a report |
| MEA | Minimum enroute altitude | Along the airway or route segment |
| MEA with G suffix | MEA applicable to GNSS equipped RNAV aircraft | Along RNAV route segments |
| MOCA | Minimum obstruction clearance altitude | Along the segment |
| MAA | Maximum authorized altitude | Along the segment |
| Segment mileage | Distance between charted points | Between fixes or navaids on the route |
| Magnetic bearing or radial | Direction reference for navigation | Along the route, at fixes and navaids |
Read one row at a time and say what job the symbol does. A black V airway tells you the navigation source and route identity. An MEA, MOCA, or MAA tells you something about the usable altitude band. A triangle tells you about a report, while mileage helps with timing and fuel.
Those altitude labels aren't decoration. They communicate the structure needed for obstacle clearance, navigation signal coverage, and route authorization. If you treat them as interchangeable numbers, you'll eventually choose an altitude that clears terrain but doesn't give you reliable navigation, or one that's outside the authorized band.
How to Use This Table for Study
Cover the middle column. Look at the symbol, name it out loud, and state where you'd expect to find it on the route. Then uncover the answer and check yourself before moving on.
Study rule: If you can name a symbol but can't say what decision it changes, you don't know it well enough yet.
Don't stop at the name. For each row, add one sentence. Say, "That's a solid triangle, so I owe a routine report unless ATC says otherwise," or "That's an MEA with a G suffix, so I need to check whether it applies to my GNSS equipped RNAV aircraft."
The legend behind this table comes from FAA chart guidance, and symbology changes over time. Confirm any unfamiliar symbol against the current Aeronautical Chart Users' Guide and the legend on the chart you're using. A memorized meaning from an old training chart isn't a substitute for the current edition.
Where Low Enroute Charts Apply and What They Show
The first fact to lock in is the altitude band. Low enroute charts support IFR navigation below 18,000 feet MSL. If you're planning above that band, you're in high enroute chart territory, which uses a different chart product and a different route structure.
The FAA describes its Aeronautical Chart Users' Guide as a teaching aid and reference that's updated when new chart symbology is introduced or when existing information or symbols change. That detail matters because chart reading isn't a one time memorization task. You learn the system, then you verify the current depiction before you fly.
What's Packed Into One Sheet
A low enroute chart layers several kinds of information on top of each other. You'll see routes, navigation aids, fixes, airspace, airports, communications information, and altitude restrictions sharing the same space, often within a few millimeters of each other.
- Routes show where you can travel and by what source
- Altitude annotations bound the altitudes you can use on each segment
- Fixes and reporting points show where position and communication events happen
- Airspace depictions warn you where special rules may affect the route
Don't read the first line you see. Sort the layers first, or you'll grab a mileage figure when you needed an MEA.
A Three Step Orientation
Say you're planning a segment at 9,000 feet. First, confirm you're holding a low altitude enroute chart and that 9,000 feet sits inside its band. Second, identify the route family by color and identifier, because that tells you what navigation source the route depends on. Third, read the altitude annotations on that exact segment to confirm 9,000 feet is at or above the minimum and at or below any maximum.
Use that same order on every chart, every time. Chart type, route family, altitude limits. It takes seconds, and it prevents the common student error of reading a correct number from the wrong segment.
Airway Symbols by Navigation Source and Color
Color is your first clue, not your final answer. Each airway family is drawn the way it is because it depends on a different navigation facility, and that facility changes how you interpret bearings, fixes, and altitude notes along the route.
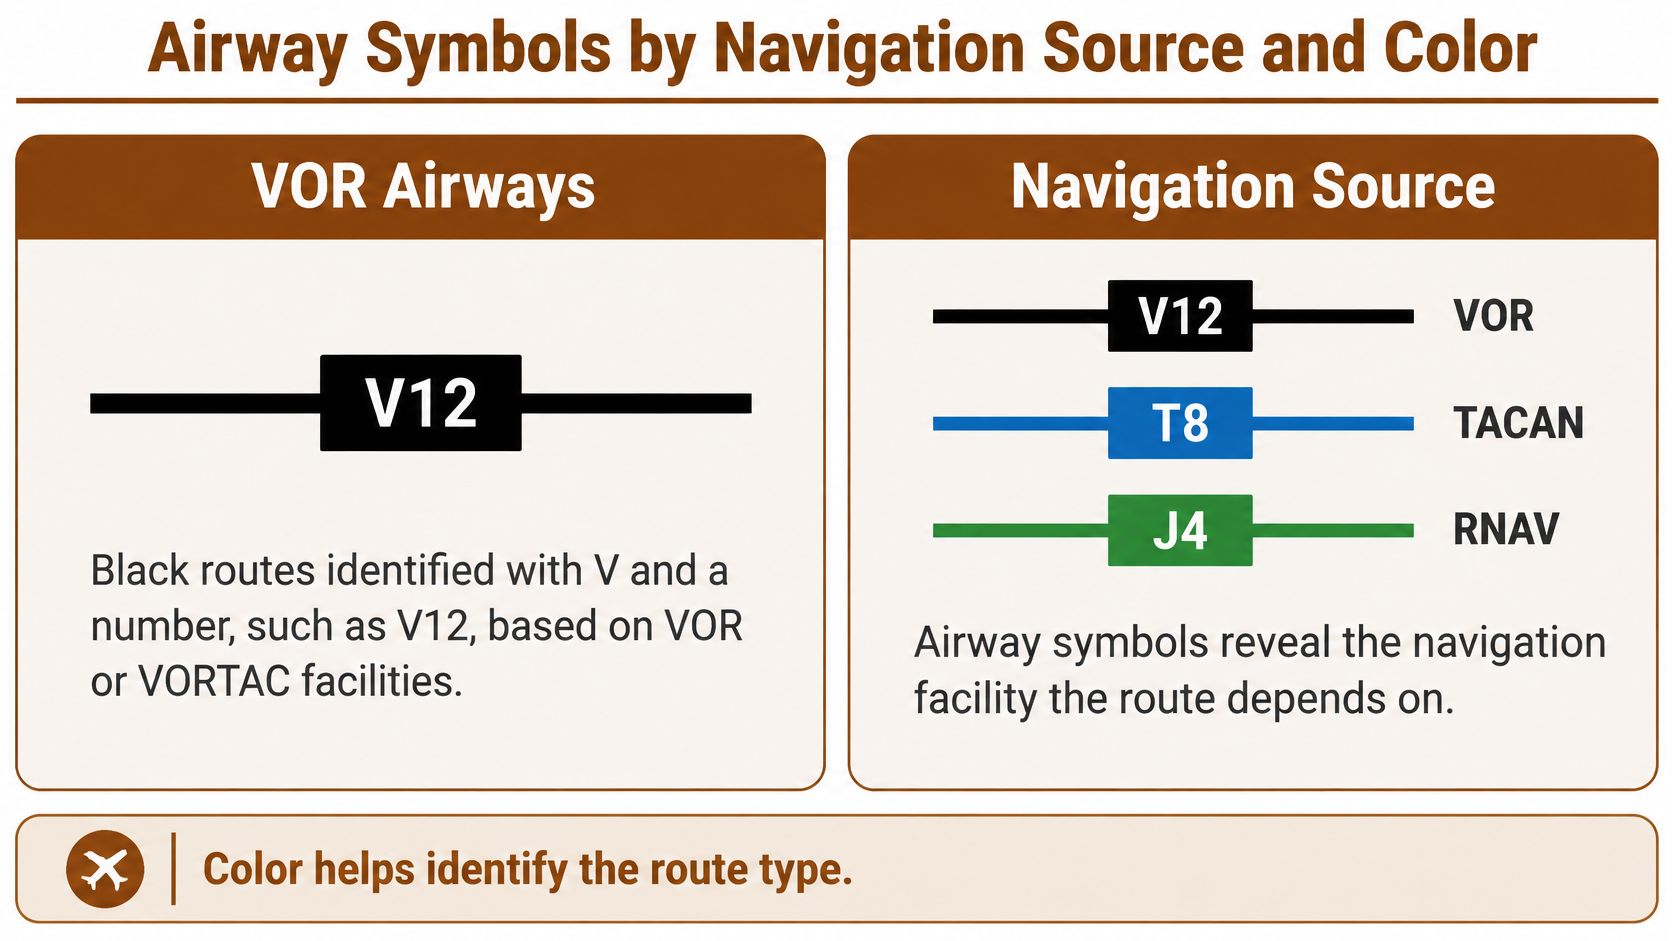
The FAA Aeronautical Information Manual section on the airway system states that the principal airway system on FAA IFR low enroute charts covers routes from 1,200 feet above the surface, or a higher specified floor in some locations, to below 18,000 feet MSL. It identifies VOR airways as based on VOR or VORTAC navigation aids, depicted in black, and identified by a "V" followed by the route number, such as V12.
Three Families Side by Side
| Route family | Depiction | Identifier | Navigation basis | Orientation |
|---|---|---|---|---|
| VOR airway | Black line | V followed by number, e.g. V12 | VOR or VORTAC facilities; outbound radials | Any direction defined by the outbound radial |
| L/MF airway | Brown symbology with colored name | Colored name and number, e.g. Amber One (A1) | Low or medium frequency facilities; inbound bearings | Green and Red generally east west; Amber and Blue generally north south |
| Low altitude RNAV route | Aeronautical blue line | Route name with named waypoints | GNSS based area navigation; magnetic reference bearings | Any direction defined by the named waypoints |
VOR airways are the black Victor routes. Their segments are described by outbound radials from the navaid, so the reference direction comes from the facility outward. Your check for this family is to confirm the VOR or VORTAC the segment depends on and the radial that defines it.
L/MF airways use brown symbology with a colored name and number, such as Amber One (A1). They're based on low or medium frequency facilities, and their routes are described by inbound bearings, which is the opposite reference from a VOR radial. Green and Red generally run east west, while Amber and Blue generally run north south. Your check here is to not apply radial logic to a bearing based route.
RNAV routes appear in aeronautical blue with named waypoints, mileage, magnetic reference bearings, and MEAs. A G suffix on an MEA means that value applies to GNSS equipped RNAV aircraft. Your check is to confirm your aircraft and approval match the route before you use a GNSS specific altitude.
The Rule Students Miss
Don't assume every line on the chart is a VOR airway just because Victor routes are the most familiar.
Distinguish the route's color and identifier first. Then verify the segment's published altitude limits and its navigation facility basis. If you skip the first step, you may read the right MEA from a route you can't legally or physically follow with your equipment.
Try it now. Pick any line on a training chart and answer three questions out loud. What's the family, what's the navigation source, and what reference does a bearing or radial on that segment use? If you can't answer all three, you haven't read the symbol yet, you've only noticed it.
Reporting Point Triangles Pilots Must Classify
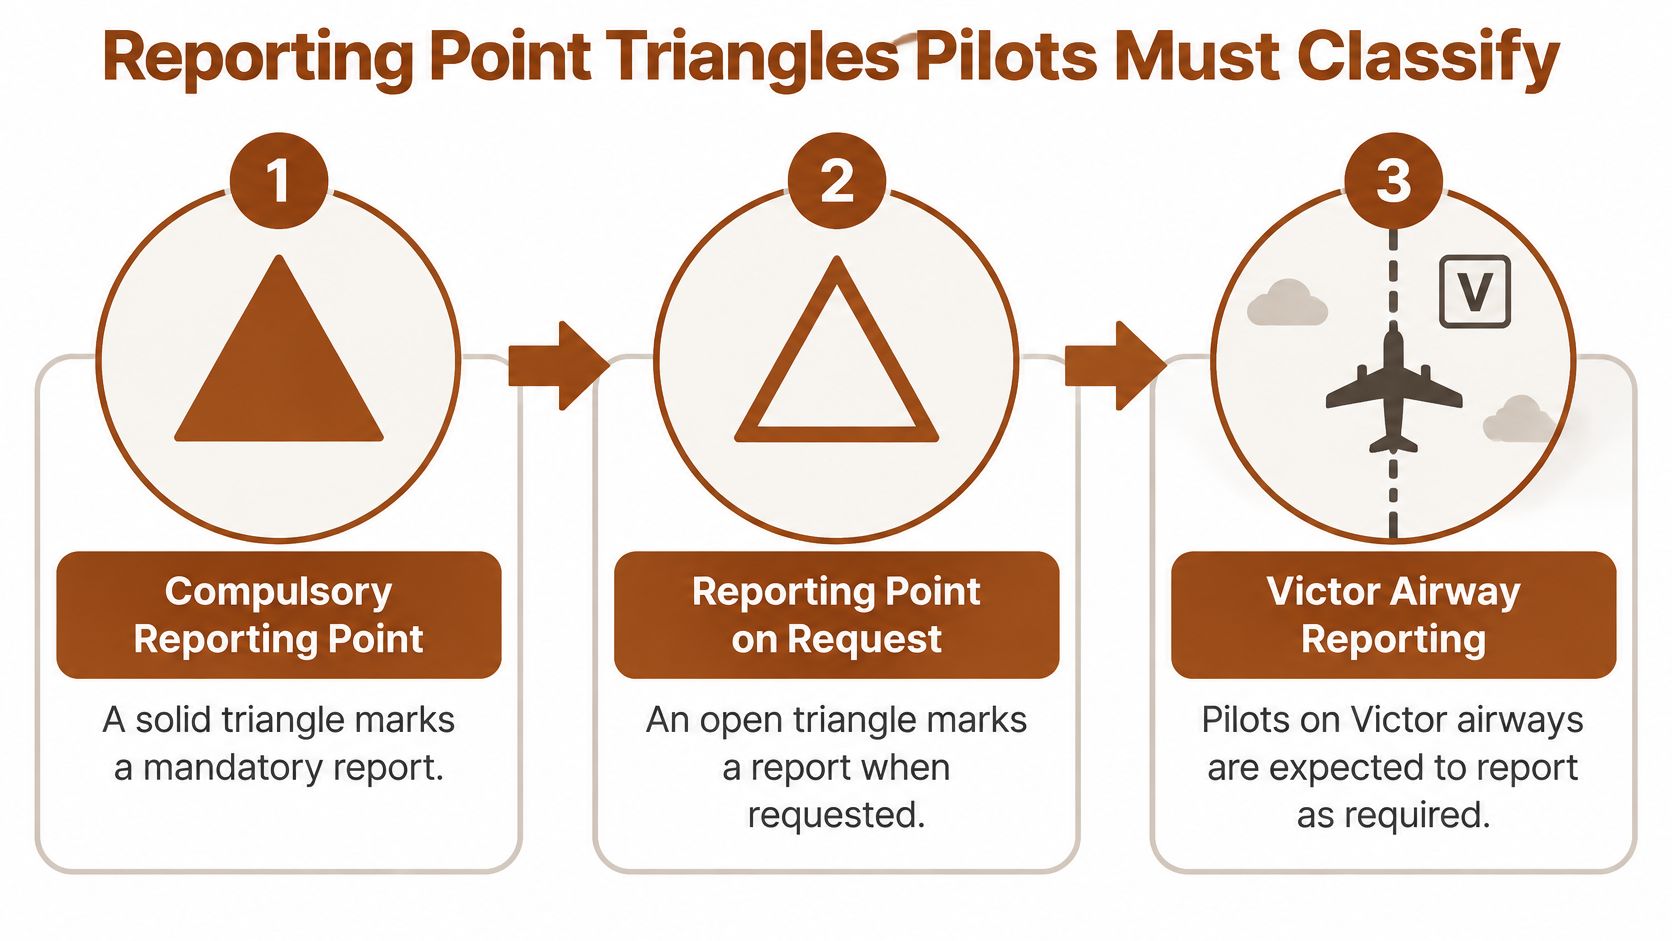
A solid triangle marks a compulsory reporting point. An open triangle marks a reporting point on request. That single difference in fill decides whether you owe ATC a routine report, so it's one of the smallest symbols with the biggest operational weight.
The FAA Aeronautical Chart Users' Guide explains that a solid triangle marks a compulsory reporting point, while an open triangle marks an "on request" reporting point. Pilots flying Victor airways are expected to report over designated points unless ATC advises otherwise, while an open triangle doesn't by itself impose the same routine mandatory report.
A Worked Example With Three Triangles
Say your cleared Victor airway segment has three triangles along it. Two are solid and one is open. The two solid points are routine reports you plan to make as you pass them, unless ATC relieves you of that requirement. The open point goes in your notes as a possible report, but you make it only if ATC asks.
Notice what the triangles don't do. They don't define your navigation fix for you, and they don't change your altitude. Reporting points are separate from navigation fixes, even when they sit at the same location, and you read them together with the route structure, communications instructions, and your clearance.
Don't Borrow Symbols From Other Charts
Students often carry a meaning from a VFR sectional, a terminal chart, or an approach plate onto an enroute chart. Don't. Symbols are organized by chart type, and a depiction that means one thing in the terminal environment may not transfer. Use the low enroute legend for low enroute chart symbols.
Your Five Step Classification Routine
- Trace the cleared route on the current chart from start to finish.
- Mark every triangle along that route, not just the ones near fixes you recognize.
- Classify each one as solid or open before you do anything else with it.
- Check your clearance and any ATC reporting instructions for changes to the routine requirement.
- Confirm current AIM procedures for reporting so your plan matches what's expected today.
Rehearse that sequence on training charts until it's automatic. In the airplane you won't have time to debate fill patterns, so the classification has to happen during preflight planning.
Altitude Abbreviations MEA, MOCA and MAA Explained
Don't memorize these abbreviations as vocabulary words. Each one describes a different kind of protection, and the protection is what decides whether an altitude is usable. If you learn the guarantee behind each label, the right choice on a test question or a real segment becomes much easier.
What Each Value Actually Guarantees
MEA, the minimum enroute altitude, is the lowest altitude on a segment that provides both navigation signal coverage and obstacle clearance. It's the floor for normal IFR flight on that segment because it's the lowest altitude where you can maintain reliable signal reception and clear obstacles.
MOCA, the minimum obstruction clearance altitude, provides obstacle clearance only. It doesn't by itself guarantee navigation signal reception, which is why a MOCA printed below the MEA doesn't authorize you to cruise there for navigation. Students lose test points here more than almost anywhere else.
MAA, the maximum authorized altitude, is the highest altitude usable on the segment. It's set by signal or structural limits of the route, and it forms the top of your usable band. MCA, the minimum crossing altitude, works differently because it applies at a specific fix when the route is flown in a given direction, not along the whole segment.
| Abbreviation | Full name | What it guarantees | How a pilot uses it |
|---|---|---|---|
| MEA | Minimum enroute altitude | Navigation signal coverage and obstacle clearance along the segment | Lowest altitude to fly on the segment under IFR |
| MOCA | Minimum obstruction clearance altitude | Obstacle clearance only; no signal guarantee | Confirms obstacle clearance; does not replace the MEA for navigation |
| MAA | Maximum authorized altitude | Highest altitude usable on the segment | Upper limit when selecting a cruising altitude |
| MCA | Minimum crossing altitude | Clearance to cross a specific fix in the charted direction | Altitude to hold when crossing that fix |
The Band, Not the Single Number
Say a segment shows an MEA of 6,000 feet and an MAA of 14,000 feet in a training example. A legal cruising altitude sits inside that band, so 8,000 or 10,000 feet works from an altitude limits standpoint. If a lower MOCA is also printed, it doesn't pull the floor down for normal navigation. It only tells you where obstacle clearance exists.
Planning rule: Keep your altitude inside the MEA to MAA band on the segment, and identify which value controls before you select an altitude.
Watch for the G suffix on RNAV routes. An MEA marked with G applies to GNSS equipped RNAV aircraft, so it may be lower than the altitude a conventionally flown aircraft needs on the same structure. Read the suffix as part of the number, not as a footnote you can ignore.
NAVAID and Fix Symbols on Enroute Charts
Airways don't float on the chart by themselves. They're built on anchors, and those anchors are the navigation aids and fixes printed along the route. If you can identify each anchor and what defines it, the route between anchors stops being a mystery line.
The Facilities You'll Meet
A VOR provides azimuth guidance, and a VORTAC combines VOR azimuth with TACAN distance function in one facility. The facility's identifier and frequency are printed beside the symbol, so the chart tells you both what to tune and what to identify. Don't just note the symbol shape. Read the identifier every time, because two nearby facilities can look similar at a glance.
DME gives you slant range distance from the facility. That distance function is what lets a fix be defined by a DME value along a radial, which is different from a fix defined by the intersection of two radials or bearings. The distinction matters for how you'll identify the fix in the cockpit. A DME fix needs working distance information, while an intersection needs two usable directional signals.
NDBs and other low frequency facilities form the basis for L/MF airways. When you see one anchoring a brown colored airway, you should expect bearing based navigation rather than radial based navigation, and you should interpret the charted direction references accordingly.
Named Fixes and RNAV Waypoints
Named fixes and RNAV waypoints are identified by name, commonly with five letter identifiers you can say over the radio and enter into a navigator. On GNSS based routes, the waypoint name isn't optional decoration. It's how you build, verify, and brief the route in your equipment, and it's how ATC refers to the point in your clearance.
A Four Item Anchor Checklist
- Facility type: VOR, VORTAC, NDB, DME equipped facility, or waypoint
- Identifier: The charted letters that name the facility or fix
- Frequency or name: What you'll tune, identify, or enter
- Definition method: Whether a distance or a crossing of radials or bearings defines the point
Run that checklist at every anchor on a practice route and say the answers out loud. If you can't state how a fix is defined, you can't reliably identify it in flight, no matter how confidently you can point at it.
One caution closes the loop. Navaid status, frequencies, and fix definitions change, and facilities are decommissioned or renamed. Verify them on the current chart and in current publications before flight instead of memorizing them as fixed facts from a training example.
Special Use Airspace and Route Notes to Recognize
The label identifies the airspace, not the color alone. That's the rule to carry into every chart. Restricted areas, prohibited areas, military operations areas, warning areas, and alert areas are each identified by a charted label, with an altitude range printed on the chart, and students who read only the boundary color routinely misidentify what they're looking at.
Why the Altitude Range Decides
Say your route passes beside a restricted area in a training scenario, and the area's published ceiling sits below your planned cruising altitude. The route line hasn't changed, but the airspace may not affect you at that altitude. Flip the numbers, and the same route at a lower altitude could put you inside the vertical limits where you need to check status and possibly reroute. Your altitude choice, not the line on the chart, decides whether the airspace matters.
That status can change, so the chart is only your starting point. Confirm current status in current publications and NOTAMs before you treat a nearby area as no factor. If you want the broader airspace framework behind these depictions, our guide to airspace classifications walks through how the categories fit together.
Route Notes Sit With the Segment
Airways also carry notes alongside them, including segment mileage and charted information about the route itself. Read those notes with the segment's altitude limits, not after you've already picked an altitude. A mileage figure feeds your time and fuel estimate, and a route note can change how you use the segment at all.
When a note sits next to a route, it's part of that segment's instructions. Skipping it is the same as skipping part of the clearance.
Your Three Item Recognition Check
- Airspace type: Read the label and name it correctly
- Altitude range: Compare it against your planned altitude
- Status source: Name where you'll confirm current status before flight
If you can answer all three for every area your route crosses or skirts, you've read the depiction properly. If you can only describe the color, you haven't.
How to Read a Symbol Cluster Step by Step
Here's the question that matters more than any single symbol definition. When several symbols and numbers appear together, which ones affect your clearance, navigation accuracy, obstacle clearance, and fuel planning? A single worked segment answers it better than another page of legend.
The FAA low altitude enroute chart product page states that low altitude IFR charts are used below 18,000 feet MSL and depict airways, NAVAIDs, minimum en route and obstruction clearance altitudes, distances, reporting points, and special use airspace. That list is exactly the cluster you're learning to combine. For a deeper symbol by symbol reference while you practice, keep our IFR chart legend guide open beside the chart.
One Segment, Read in Order
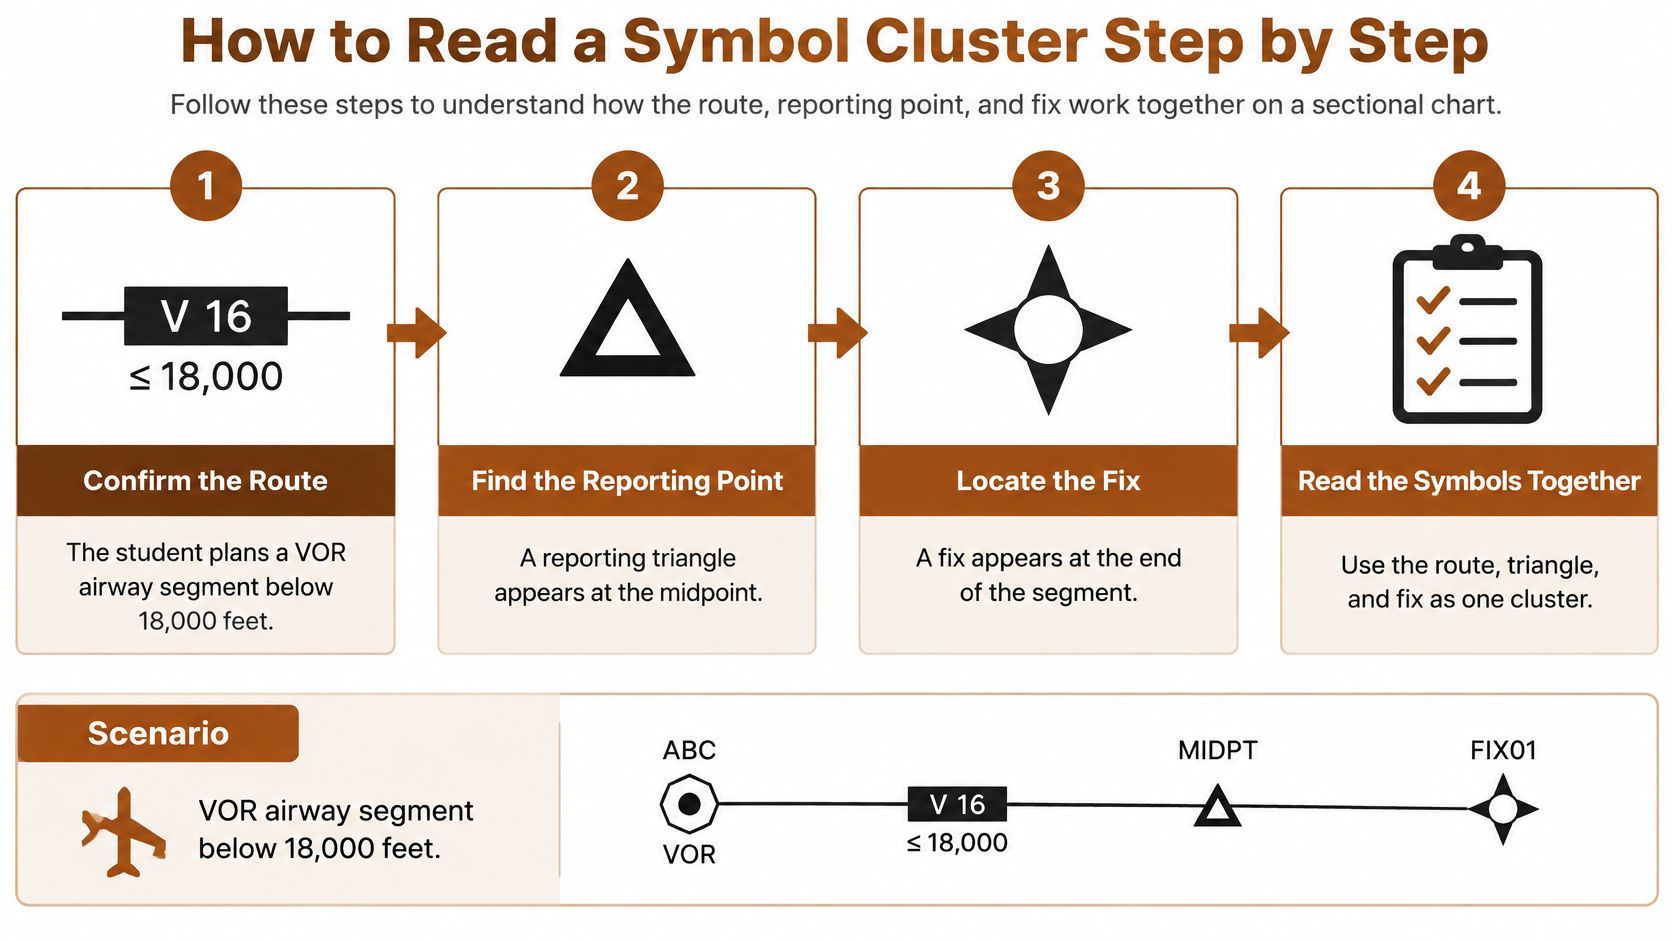
Say you're planning a VOR airway segment below 18,000 feet. There's a reporting triangle at the midpoint, a fix at the end, and the segment shows an MEA of 6,000 feet and an MAA of 14,000 feet for this example.
- Confirm the chart. Verify it's a low altitude enroute chart and your planned altitude sits in its band.
- Identify the airway. Read the color, identifier, and navigation basis so you know which facility the segment depends on.
- Read the MEA. Note the floor for navigation and obstacle clearance, plus any G suffix if the route is RNAV.
- Bound the altitude. Read the MOCA and MAA so you know what obstacle clearance alone provides and where the top of the band sits.
- Classify the triangles. Decide whether each reporting point is compulsory or on request.
- Check the fix. Confirm the fix type and the navaid or method that defines it.
- Record mileage and bearing. You'll use these for timing, fuel, and your navigation cross check.
- Check special use airspace. If the segment crosses or skirts a restricted area, prohibited area, warning area, MOA, or alert area, read the charted altitude range and confirm status in current NOTAMs before your altitude is final.
Accept One Altitude, Reject Another
With an MEA of 6,000 and an MAA of 14,000, you'd accept 8,000 feet because it sits inside the band with navigation signal coverage and obstacle clearance. You'd reject 5,000 feet because it's below the MEA, even if a lower MOCA is printed on the segment. The MOCA clearing obstacles doesn't rescue an altitude that can't guarantee navigation.
In one line, the MEA to MAA band sets the clearance altitude, the MOCA is obstacle clearance only, the solid triangle sets the report, and the mileage sets the fuel estimate.
What to Memorize and What to Verify
Memorize the system for the knowledge test. Know the families, the triangle meanings, and what each altitude abbreviation guarantees, because the test asks you to apply those meanings without a legend in front of you.
Verify the specifics on the current chart before each flight. Segment altitudes, fix definitions, facility status, and airspace status all change, and chart depictions change with them. Your memory tells you how to read, and the current chart tells you what's true today.
Build a Symbol Drill Before Your Knowledge Test
Don't reread the lookup table and call it studying. Turn it into a drill that forces recall, then apply it to a real segment. Fifteen focused minutes of that will teach you more than an hour of highlighting.

Your Six Step Drill
- Make a card for each table row, with the symbol on the front and the meaning on the back.
- Cover the meaning and call each one out. V12 is a black VOR airway, a brown Amber, Blue, Green, or Red line is an L/MF airway, an aeronautical blue line with named waypoints is RNAV, a solid triangle is a compulsory report, an open triangle is on request, and you still owe yourself MEA, the G suffix, MOCA, and MAA.
- Trace one Victor segment on a current low altitude chart below 18,000 feet MSL and write down the identifier, MEA, MOCA, MAA, mileage, bearing, and every triangle.
- Solve altitude questions against the band. Accept answers from the MEA up to the MAA and reject any choice that drops to the MOCA alone.
- Log every miss and open your next session with only those items.
- Recheck unfamiliar symbols in the current Aeronautical Chart Users' Guide before the exam or a flight.
After one week of daily passes, test the same material under exam conditions. Our question bank covers topics including airspace, navigation, VOR and GPS, IFR clearances, holds, approach plates, weather theory, METARs and TAFs, regulations, and sectionals, with detailed, plain English explanations for every single question. Progress tracking shows you when you're ready to test, and our instrument written test prep plan shows how to structure those final weeks.
Schedule the knowledge test when your practice scores hold in the passing range across several sessions, not after one good day. Consistency is the signal that the symbols have become decisions instead of memorized shapes.
When you're ready to turn chart symbol recall into consistent passing scores, flyCowboys gives you exam style questions on airspace, navigation, IFR clearances, and approach plates, each with a plain English explanation that shows why the answer works. Practice the low enroute chart symbols you've drilled here, watch your progress tracking confirm you're holding in the passing range, and then schedule your test with confidence.