· 16 min read
How to Read an Approach Plate: A Pilot's Briefing Guide
Learn how to read an approach plate step by step: header, plan view, profile, minima and missed approach, with worked examples and common mistakes.

You're 15 miles from the airport in solid cloud, the controller gives you a new runway, and you're staring at a plate you've never briefed. Your eyes jump to the big numbers at the bottom, then to the map, then back to the top. Nothing connects. That's the moment most instrument students describe when they say approach plates feel overwhelming.
The problem usually isn't that you don't know what IAF or FAF means. It's that you're reading symbols in random order while you're supposed to be flying. Learning how to read an approach plate means learning a fixed briefing order, so the same questions get answered the same way every time, before workload peaks.
Table of Contents
- Brief the Plate in Six Steps
- Check the Chart Version and Title First
- Tracing the Plan View to the Final Approach Fix
- Reading the Profile View and Altitude Symbols
- Minimums and the Missed Approach You Must Brief
Brief the Plate in Six Steps
A student pulls up a plate, finds the final approach course, skims the minimums, and starts briefing the route. Halfway through, the instructor asks a simple question. Does your airplane have the equipment this procedure requires? The student goes quiet. That line was in the briefing box at the top, and it decided whether the approach was legal before the route mattered at all.
Treat the plate as a sequence of decisions, not a poster of symbols. The FAA Aeronautical Information Manual change states that the procedure title and chart notes indicate the navigation equipment required to join and fly an IAP, while route, altitude, profile, and missed approach information sit in separate areas of the chart. Your job is to connect those areas in one order, every time.
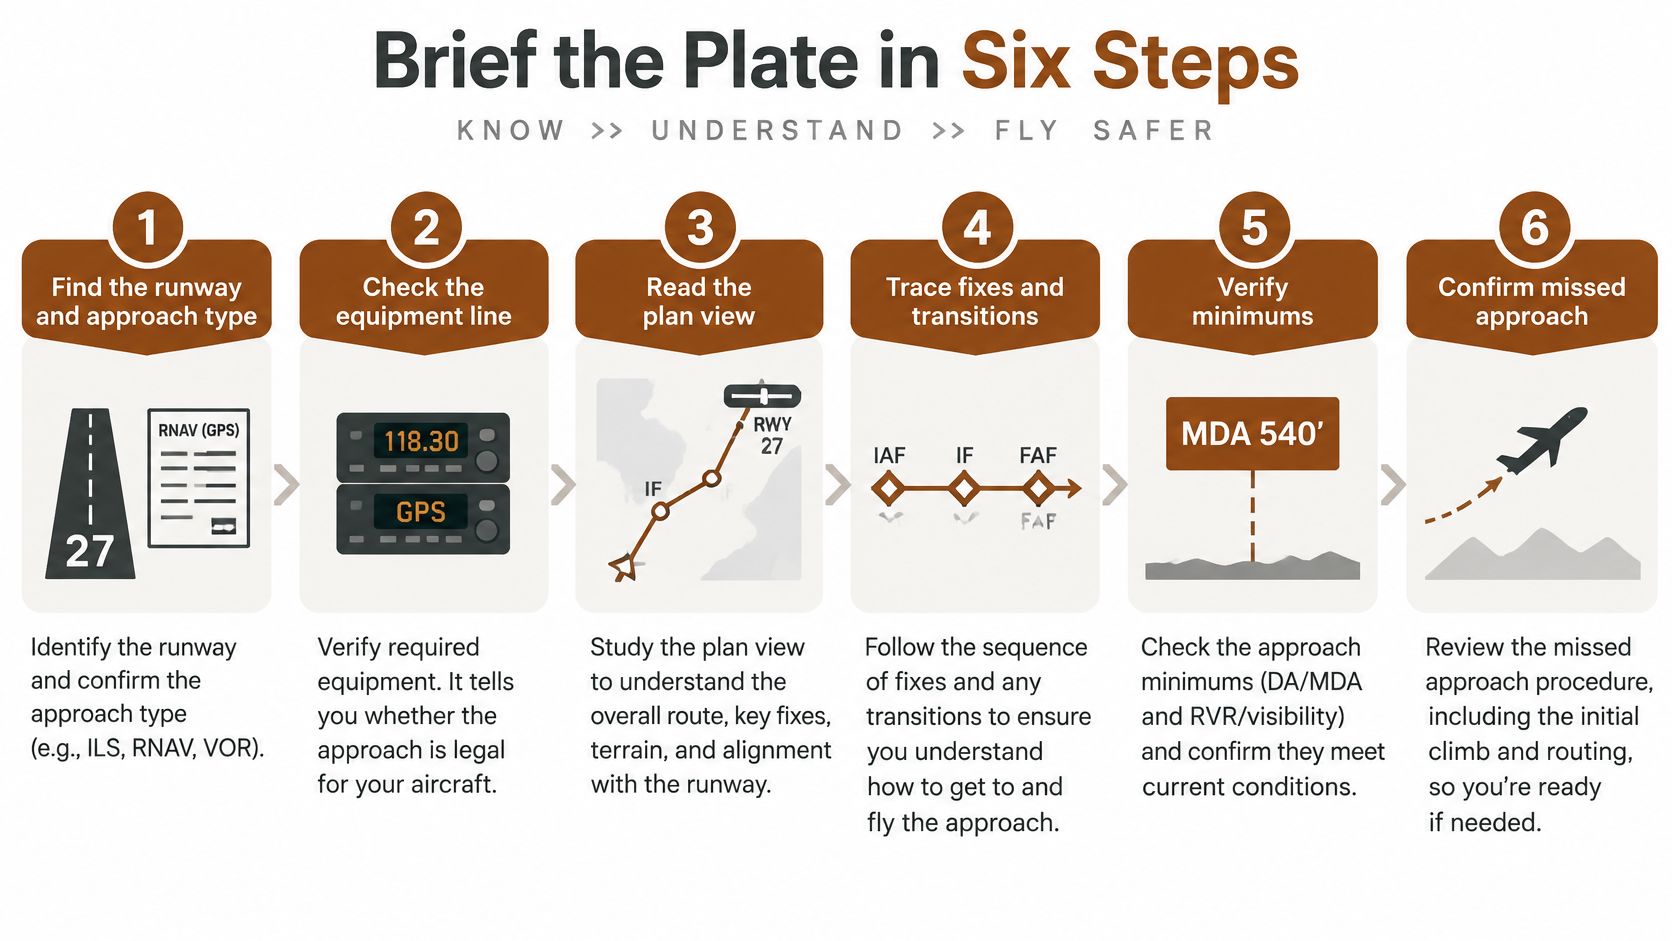
The Six Step Briefing Order
| Step | What to check | Where on the plate |
|---|---|---|
| 1 | Title, runway, procedure type, revision date and NOTAMs | Header block and title bar |
| 2 | Navigation equipment, approach frequency, final approach course, glidepath, minima and full missed-approach text | Pilot-briefing box |
| 3 | Arrival path through the IAF, IF and final approach fix | Plan view |
| 4 | Segment altitudes, step-down fixes, descent angles and distances | Profile view |
| 5 | Entry type, NoPT, procedure turn or hold-in-lieu | Plan view and procedure notes |
| 6 | Missed approach flown as a separate procedure | Missed-approach text and icons |
Pick any plate and work down the table out loud. Say the title and runway first, because a wrong plate makes every later number wrong. Then read the pilot-briefing box completely. Don't cherry-pick the frequency and move on. Equipment, final approach course, glidepath information, minima, and the full missed approach text all live there or connect directly to it.
Briefing stop rule: If you can't fill in a row of the table, stop and find it. A blank row means you haven't briefed the approach yet, even if you've looked at the plate for five minutes.
Steps three and four turn the chart into a flight. Trace where you'll join, not every route printed on the page. Then match that lateral path to the profile, so each fix gets an altitude and a distance. Step five answers how you'll get aligned. Step six treats the missed approach as its own procedure with a first turn, a climb altitude, a fix, and holding instructions you'll fly without re-reading anything.
Test the Sequence Against a Late Clearance
Now change the scenario. You briefed a full procedure from an IAF, but ATC vectors you directly onto the final approach course instead. Students often assume the original brief still applies. It doesn't, at least not automatically. Your entry just changed, so you need to recheck what the new clearance allows you to fly.
Run a short version of the sequence against the vector. Confirm you're on a published segment or being vectored to join final at an altitude that works for that segment. Check the altitude you must maintain until established, confirm the FAF and minima still match the procedure you were cleared for, and re-brief the first missed approach move. If any of that doesn't line up, ask ATC before you accept and descend. A worked IFR clearance example helps you practice hearing how that clearance changes your limits.
Say it as a spoken checklist. "Cleared ILS runway 27, vector to final, maintain assigned altitude until established, intercept outside the FAF, DA, missed approach first turn and altitude." If you can't say that cleanly, you're not ready to descend.
Practice It the Way You'll Be Tested
For the IFR knowledge test, don't just hunt for the answer choice on a plate. Run all six steps on a set of plates and say each briefing aloud. That habit exposes weak areas fast, whether it's equipment notes, entry types, or minima. Our study topics cover approach plates alongside IFR clearances, holds, navigation, VOR and GPS, regulations, weather, and the rest of the exam areas, and step one is telling us your rating, PPL or IFR, and taking a short placement quiz so we can build a personalized study plan around your weak areas.
Your assignment today is concrete. Pick a plate you'll fly next week. Complete the six-step briefing on it now, out loud, before you're in the airplane trying to do it under pressure.
Check the Chart Version and Title First
Your tablet shows one revision of an ILS procedure. The paper binder in the airplane shows another. The runway and title look the same, so you shrug and brief from whichever is open. That's exactly how a pilot ends up flying a changed altitude or a cancelled segment with total confidence.
Currency is the first briefing item, not an administrative chore. The FAA AIM chapter on instrument approach procedures urges pilots to use the latest chart issue and notes that U.S. civil IFR approach charts use a 56-day amendment cycle, with a midcycle change-notice volume. A plate can look familiar and still be out of date.
Digital sources add another layer. The FAA digital Terminal Procedures Publication page says digital Terminal Procedures Publications are issued on a 28-day cycle, while paper TPP volumes use a 56-day publication cycle and interim change notices can update, revise, or cancel procedures before the next effective date. Different cycle lengths explain why your EFB, panel database, and paper chart don't always match on the same morning.
A One Minute Currency Checklist
Run this before every briefing, in this order.
- Match the procedure: Confirm the procedure name, runway, and airport on the plate match your clearance and flight plan exactly, including any letter suffix.
- Check the date: Compare the amendment or effective date on the plate against the current publication cycle, not against the date you downloaded the file.
- Scan the NOTAMs: Look for NOTAMs on the airport and on the specific procedure, since a NOTAM can raise minima or take a navaid out of service.
- Confirm authorization: Verify your aircraft equipment and database support the navigation type, such as an RNAV or WAAS-based procedure, and the minima line you plan to use.
- Compare your sources: Check that the EFB plate and the panel database describe the same procedure, fixes, and altitudes before you brief from either one.
If two sources disagree, the current published chart governs. A plate you can't verify is not a plate you brief from.
That decision rule feels strict on the ground. In the air it's a relief, because it removes debate. You don't average two versions or pick the one with lower minima. You stop, resolve the discrepancy against the current published source, or you choose a procedure you can verify.
This check takes under a minute once it's a habit. Skipping it creates the most avoidable briefing error there is, because every correct thing you brief afterward is built on a chart that may no longer exist.
Tracing the Plan View to the Final Approach Fix
The plan view is the top-down map of the procedure, and students get lost in it because they try to read all of it at once. Don't. You only need the path you'll fly from your arrival direction, plus the notes attached to that path. The photo below shows how a pilot works the plan view physically, finger on the route, rather than scanning the whole page.
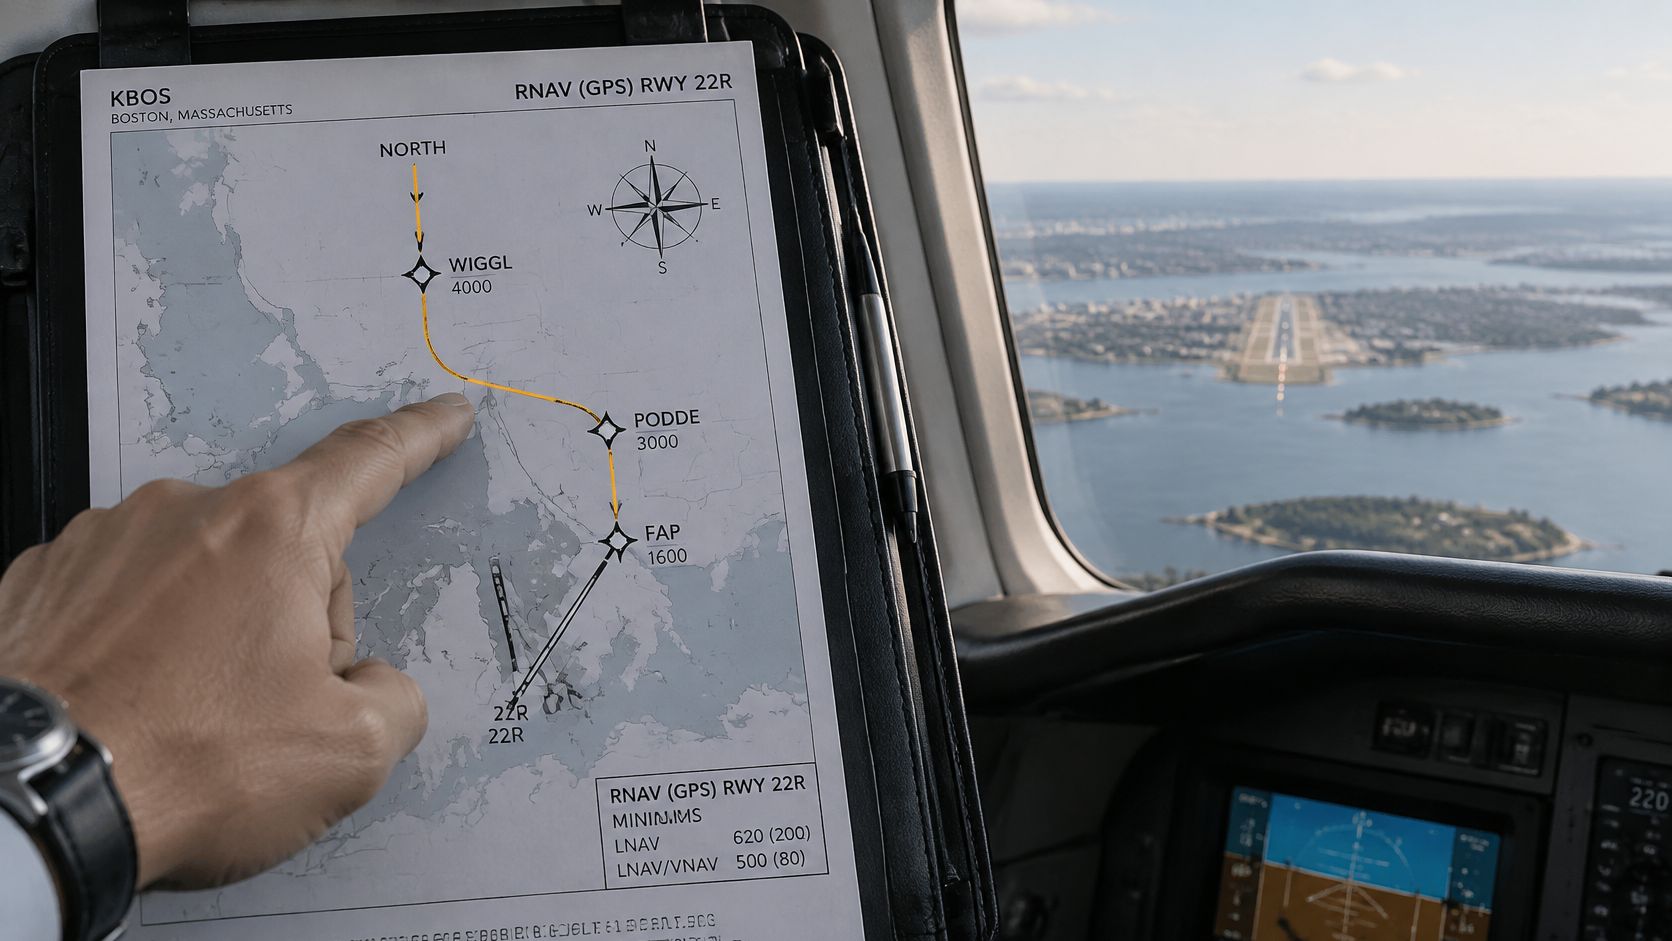
Symbols You Must Recognize First
- IAF and IF: The initial approach fix and intermediate fix appear as labeled waypoints on the route. The IAF is where the approach segment begins, and the IF is where you're aligning with the final course and configuring for descent.
- FAF: The final approach fix is marked with the Maltese-cross symbol in the profile view and sits on the final course in the plan view. It's the gate where final descent begins.
- Procedure turn barb: The offset barb on the route line marks a course reversal. It tells you a procedure turn is part of the entry from that direction.
- Feeder routes: Lines connecting enroute fixes or navaids to an IAF, each with its own course, distance, and minimum altitude.
A Northern Arrival Walked Through
Say you're arriving from the north, but the feeder route for your clearance ends at an IAF on the east side of the field. Your first task isn't the final course. It's finding how the chart gets you from your arrival fix to that IAF. Put your finger on your arrival point and trace the published route, reading each course and distance as you go.
From the IAF, follow the route to the IF. Note the course change, if any, and the distance between the fixes, because that segment is where you slow down, configure, and get established. Then continue to the FAF on the final approach course. By the time your finger reaches the FAF, you should be able to say every course you'll fly and how far apart the fixes are, without looking at parts of the procedure you'll never use.
Entry type comes from the notes and routing for your segment. Terminal entry normally uses either NoPT routing, meaning no procedure turn is required or authorized on that segment, or a course-reversal maneuver such as a procedure turn or a hold-in-lieu of procedure turn. The plate tells you which applies to your arrival. Don't assume a procedure turn is always required, and don't fly one on a NoPT segment.
Watching the trace done once, start to finish, makes the sequence click faster than reading about it.
Segment Notes and the Missed Approach Text
Restrictions on the plan view are segment-specific. A RADAR REQUIRED or DME REQUIRED note may apply to one feeder route or one segment, not automatically to the whole procedure. Read each note against the segment you're flying. The most common error here is briefing the lateral path alone, tracing a clean line to the runway, and missing the note that made your segment unavailable with your equipment. If enroute chart symbols are still shaky, reviewing low enroute chart symbols will make feeder routes easier to read.
Finish the plan view at the missed approach holding pattern, then read the full missed approach text as written. The icons give you a shape. Only the text gives you the first turn, the climb altitude, and the holding instructions in flyable form.
Reading the Profile View and Altitude Symbols
The profile view is the side view of the approach, and it answers one question. At each fix, how low are you allowed to be? The governing rule is simple. Every altitude on the plate is segment-specific, not interchangeable. An altitude that protects you on the intermediate segment doesn't authorize anything after the FAF.
Read it in flight order. Start with the published initial and intermediate altitudes. Find the FAF and the altitude you cross it at. Then identify the minimum altitude after each step-down fix, and finally the point where descent to the MDA or DA/DH is authorized. The FAA AIM guidance on approach segments frames the cross-check the same way, tying chart title, database currency, equipment, altitudes, distances, and missed approach together before the approach gate.
Altitude Symbols on the Profile View
| Altitude type | How it appears | What it requires |
|---|---|---|
| Mandatory altitude | Bar above and below the value | Cross the fix at exactly that altitude |
| Minimum altitude | Bar below the value | Do not descend below it at that fix |
| Maximum altitude | Bar above the value | Do not exceed it at that fix |
| Step-down altitude | Altitude shown at a step-down fix | Hold the altitude until past the fix, then descend to the next step |
The bars provide the complete message. A bar underneath indicates the number is a floor, and descending early because the next segment is lower puts you below obstacle clearance for the segment you're still on. Students commonly brief the lowest number they see and treat it as a target. Brief the sequence instead. Each fix allows the next descent, and nothing allows an early descent.
Descend when the fix authorizes it, not when the airplane feels ready. The profile view is a series of gates, and each gate has its own floor.
Cross Checks Before You Descend
Before descent, compare your altimeter setting with the source the chart expects. A wrong setting shifts every altitude on the procedure. Then check cold-temperature restrictions. Pressure altimeter errors in cold air can leave the aircraft physically lower than indicated, so you must apply the published cold-temperature corrections on the affected approach segments. On a standard day this never comes up. On the cold day it does, it's the difference between indicated altitude and actual obstacle clearance.
For an RNAV procedure, confirm the waypoint sequence in your navigator matches the plate, check the required navigation capability and WAAS channel where applicable, and verify your equipment supports the published minima line you briefed. Don't substitute GPS-derived altitude for the barometric altimeter. GPS vertical errors can invalidate integrity monitoring, and the procedure's altitudes are flown on the barometric altimeter.
One more trap deserves naming. Don't use an apparent magnetic bearing to guess your position relative to right-base or left-base IAFs. Use the published routing and your actual navigation display. Close with the habit that ties it together. Say each segment altitude aloud, in order, and confirm it against the profile before you reach the first step-down fix.
Minimums and the Missed Approach You Must Brief
The minima box is where students ask the most direct question in instrument training. Which number is my limit? The box usually shows several, and picking the wrong row can put you hundreds of feet below where you belong. Start with the table, then learn how to choose your row.
| Minimum | Where it appears | Applies to |
|---|---|---|
| DA(H) | Precision approach minima box, height above touchdown | Approaches with vertical guidance |
| MDA(H) | Non-precision minima box, height above airport | Approaches without vertical guidance |
| Visibility or RVR | Beside the DA or MDA value | Converted to the required visibility for the runway |
| Circling MDA | Separate circling line in the minima box | Circling to a runway other than the one aligned with the final |
Picking Your Row
Your approach type decides the row. If you're flying vertical guidance to a decision point, your limit is the DA(H). At that altitude you either see the runway environment and land, or you go missed immediately. There's no leveling off to look around. If your approach has no vertical guidance, your limit is the MDA(H), a floor you can descend to and fly level at until the missed approach point.
The visibility or RVR value sits beside whichever altitude applies. Brief them as a pair, because meeting the altitude requirement without the visibility doesn't authorize a landing. Circling minimums live on their own line and apply only if you'll maneuver visually to a different runway. They're not a backup straight-in number, and they don't apply just because the wind favors another runway.
Brief it in one sentence. "My minimums are DA as published with the visibility beside it, and if I don't see the runway environment there, I go missed." If your call to ATC or your instructor sounds vague at this point, tighten your radio procedure so the numbers come out clean under workload.
Brief the Missed Approach as Its Own Procedure
The missed approach isn't an afterthought at the bottom of the brief. It's a second procedure you might fly at your lowest, busiest moment. Build the brief from the full text, in flyable order. Name the first turn or state that you'll climb straight ahead. Name the climb altitude. Name the course, heading, or fix you'll fly to. Then name the holding instruction, including the fix and how you'll hold.
Say it aloud in this shape. "Missed approach, climb straight ahead to the published altitude, then follow the course to the holding fix as written, and hold as published." Replace the general words with the actual altitude, course, and fix from your plate. If you can't say it without looking, you haven't briefed it.
Finish with a physical habit. Write the missed approach on a card or in your flight log before the approach starts, next to your minimums. When the runway doesn't appear, your hands should already know the first move.
If approach plates still blur together under pressure, we built our IFR study plan to turn this six-step briefing into a repeatable habit with practice questions that force you to brief, not just recognize symbols. Start building that habit today at flyCowboys and work your next plate all the way to the missed approach before your next lesson.